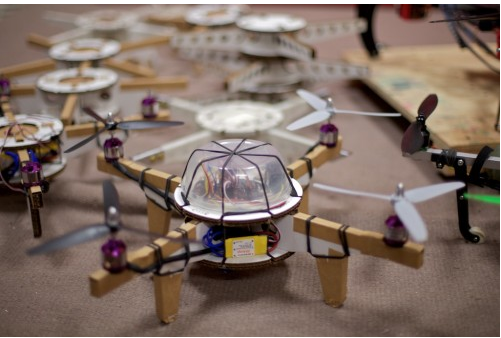
Maybe you
want to build your own? Maybe you want to take this design and mod it for
agility, weight, or style. Awesome. First, here’s the base pattern:
Getting Started
First off,
you’ll need some tools:
·
CNC laser cutter. In theory, you could cut these parts out with an
x-acto knife, which is madness. You’ll want to borrow a laser cutter. Honestly,
you should just buy one. They’re the absolute best thing in the world, and the
prices are dropping very fast. Check out Hurricane
Laser, for example. Or TechShop.
·
Scissors, for cutting tape.
·
Soldering iron, and solder.
·
A can of Super77 spray glue.
·
60degree hole chamfer. Handheld is fine.
You’ll need
the following build materials. For my examples, I use cardboard sheeting from
ULINE.
·
Several sheets of 4mm cardboard. The thickness matters, if you change
the thickness, make sure you update the tab cutouts to match. They’re 3x the
thickness, or 12mm.
·
Brown paper packing tape for sealing the edges. The clear stuff doesn’t
stick very well. You can also use fiber reinforced tape.
·
4×4″x1/8″ black ABS plastic sheet. You can also use heavy card stock,
sheet metal, acrylic, or aluminum bar stock.
·
No. 127 Black ESD or similar. 7”x1/8″
·
One 14oz ZipLock plastic container, or other lightweight 5″ diameter
bowl.
·
Double sided copper clad PCB board, you’ll need about a 0.5×0.5″ square
piece.
·
4 paperclips.
For
electronic components, you’ll need the following:
·
4ea 22mm brushless outrunner motors. I’ve used both Cobra 1300kV and
DiyDrones 850kV motors.
·
4ea matching prop adapters for your motors and propellers.
·
4ea regular propellers. GWS 8×3, GemFan 10×45, etc. Yes, 4ea. You’ll
want extras, lots of extras. You’ll break a lot of props at first.
·
4ea reverse propellers.
·
4ea ESC controllers for your motors, with an on board BEC. I use 20A
NextLevel controllers.
·
20mm heatshrink, for the covering the copper clad power board.
Electrical tape works too.
·
6mm heatshink for covering connectors and wires.
·
0.1″ spacing jumper wires, female socket. For the battery power sense
line.
·
Controller board. I use the Quadrino Zoom.
·
Cable assembly for Quadrino Zoom.
·
Spread spectrum 2.4ghz transmitter and receiver. 6 channel or better.
Spektrum DX6i, etc. There are 4 control channels, and 2 mode channels. You’ll
need another two channels if you want to add head tracking later.
·
2-4ea, 2000-1300mAh 3S LiPo battery. Trust me, you’ll want more than
one. Your motors must match the battery voltage. I use Turnigy batteries.
·
Lipo battery charger.
·
Battery connector plug and wires. I use XT60 plugs.
·
Sparkfun Blutooth module, if you want wireless telemetry. Totally
optional.
·
Nylon mesh wire sleeve. I use this to protect the motor leads from prop
strikes. Also optional.
It’s a lot
of parts and pieces, it’s true. Depending on where you source things from, and
how fast your shipping times are, it can take up to a month for all the parts
and pieces to arrive. HobbyKing has notoriously long wait times, for example.
If you care about customer service and speed, order domestic. I recommend Innov8tive Designs.
Got all your
parts and pieces? Great! Let’s get started…
Step One – Cut The Pieces Out
The major
consideration when cutting out the corrugated paper parts is to make sure the
corrugation pattern runs it different directions for the different layers. This
helps to create an internal truss structure and makes the beam considerably
stronger once assembled. Note also, that how evenly the layers are glued
together will affect the strength of the beam dramatically.

The
corrugation patterns should look like so when they’re all stacked up.
Sometimes, as is in the case of parts from ponoko, you may not be able to get
the corrugation pattern to line the way you want it to. This is okay. The order
and direction of the layers isn’t that crucial, just that they change angle
between layers.
For the
motor mounts, which are just little tabs that screw into the back side of the
motor, I used ABS. It cuts great on a laser, usually in a couple passes. ABS is
extremely impact resistant, but it does have two undesirable properties: it
smells really bad when cut, and it’s susceptible to long term UV damage. Use
proper ventilation, and wait a few minutes after your done cutting before
opening the laser bed door. It will smell for a few days, but eventually will
be tolerable.

The motor
mounts can be made out of pretty much anything, you could use aluminum bar
stock from the hardware store, and drill out the motor mount screw holes. You
could laser cut heavy tag board, or acrylic. Anything that is reasonably stiff
will work. You could even use 1/8″ plywood, but ABS or aluminum will last the
longest.
Step Two – Glue It Together
Next up we
glue the pieces together. I use Super77 spray adhesive, which Joachim points
out in the previous Tricopter build post, is expensive. It’s also not as strong
as paper glue, but in practice, it really doesn’t matter all that much. In the
15 or so frames I’ve built so far, none has ever failed.

As the arm
layers are symmetric, it’s possible to have all the exterior faces show the
white side of the cardboard outward. Start by labeling the two middle arm
layers, they’re the ones with the horizontal or vertical corrugation pattern.
Placing them down, brown side up, along with two of the four outside layers, on
a sheet of newsprint. Set the other two outside layers aside, we won’t be
spraying them with glue. Spray the four total arm pieces with Super77.
To give
myself a little wiggling room, I don’t wait until it’s dry before I carefully
pick up the middle piece and place them each on their matching outside layer.
Alignment is important, if the arms are misaligned it will be harder to mount
the motors vertically later. If one of the motors is tilted slightly, it will
cause minor yaw drift. You can usually trim this out in the controller though.
Make sure you check the alignment of the notch corners.
Remember, it’s an accuracy test, not a speed
test 
Then we
spray one side of the bottom plate layers, and the underside of the upper top
plate layer with glue. Again, alignment is important. While the orientation of
the bottom plate doesn’t matter too much, make sure that the quadrino wire
holes are oriented down, and that the label for motor A is in the upper left
corner. Otherwise the labels will be wrong.

Step Three – Tape The Edges

This is an
important step. The edges of cardboard aren’t particularly strong. To keep them
from getting crushed and damaged over time, we need to place tape across them.
The type of tape we use is also important. A paper gum tape is the best. This
is the kind where you wet one side with a sponge to make it sticky, like a
stamp. As an added bonus feature, it comes in white. You’ll want to use a gum
tape if you’re going to coat the frame in polyurethane or resin later. Coatings
will dramatically increase the stiffness and strength of the frame, at the
expense of a little bit more weight. You can also use a craft paper and glue in
lieu of tape.
If you’re
not going to coat the frame, use brown paper boxing tape. Avoid clear boxing
tape, it’s terrible and comes undone easily. The brown paper boxing tape is
very strong.

Start by
taping the top edges, and on the undersides. For the motor mount area I wrap an
extra layer of tape around the arm. I also cover the feet, as they take a lot
of impact.

Put a tiny
little piece of tape over each tab, and re-cut the paperclip slit with a knife.
This will make the tabs easier to insert without them getting damaged.

Once all the
tabs and edges ares taped, we’re ready to assemble the frame. Slot the arms
together, and push them gently into the upper plate. Add a pair of paper clips,
and set the bottom plate aside. To make the paper clips easier to remove later,
I bend them up at 90 degrees on one side, and then slot them in.
Step Four – Solder The ESCs

I use a tiny
copper board to solder all the ESCs together. You can also strip the wires a
little more, and solder them all together. If you do this, wrap the bundle
together with some thin, bare copper wire. It will make soldering the mess
together much, much easier. The most important thing, is to have two of the
ESCs pointed in one direction, and two pointed in the other.

I then solder on the battery connector whip, and add two motor controllers. After it cools, I slide a piece of the large heatshrink down over the wires, and out of the way. Then I solder the remaining two motor controllers and a small 22AWG red wire to the positive rail.

The little
red wire will be used for on-board voltage sensing by the controller. If you
bought female 0.1″ spacing jumper wires, use one of these. After that cools, I
slide the heatshrink over the whole mess and shrink it down. Viola! A nice
little power distribution board
I put nylon
mesh jackets on the motor lead wires. This helps keep them neat and tidy, and
protects the leads from prop strikes and other mishaps.
Step Five – Attach The Motors

I put nylon
mesh jackets on the motor lead wires. This helps keep them neat and tidy, and
protects the leads from prop strikes and other mishaps.

As your
motors probably didn’t come with the 3mm bullet connectors, you’ll want to
solder them on now. I use a little piece of cardboard with holes punched in it
to keep them stead while soldering. Drilling into a block of wood also works
well too. Careful, if you put them in a metal vice it will make it very
difficult to heat the connector and wire up.
Unlike most multi-rotor designs, the thing this one lacks is screws. Except for the motor mounts, pretty much no way out of that. This is important because screws, bolts and standoffs can add a lot to the cost of a frame. There are a lot of different ways to construct the motor mounts, but what’s most important is that there be two flat tabs sticking out from under the motor that are about 0.5″ or 12mm wide which we can use to tape the motor onto the arm. I can hear you now: “tape?” If you use the right tape, it works amazingly well.

The first step
is to use the hole chamfer to but a bevel in the the motor screw holes one one
side. The next step is also important: on the other side, taper the center hole
slightly. This is important as otherwise the shaft snap collar on the motor
will brush against the motor mount and you’ll see a lot of yaw drift in flight.
Attach the motor mounts to the underside of the motors, and put a little Lock-Tight in the screw holes. Without it, they’re pretty much guaranteed to vibrate out in flight, sending you on a quick trip to the hardware store for a somewhat rare 3mm machine screw

.
Place them
at the end of each arm and tape them down tight. If they’re
taped on loosely the extra play will get larger over time from vibration. If
they’re tight they’ll stay put for a very long time.
Step Six – Finishing
The remainder of the build involves rubber bands. Lots of rubber bands. I use 7″x1/8″ No. 127 Platinum Crepe brand black rubber bands to attach components, hold on batteries, and keep things put. They’re very fast to add and remove, and unlike zip-ties, they’re reusable.

I use four
rubber bands to secure the motor lead wires to the arm. Hook it onto the
landing leg, wrap it around twice, and loop it over the same leg.

Another two to hold the ESCs in place. It goes from one side, to the other.

One to hold
the battery pack on. This one has to be attached while the plate is removed,
after that you just pull on the middle section and slide a battery in. If you
have a particularly heavy battery add two rubber bands. One will probably be
enough.

One more to
hold the controller in place. Be careful to avoid resting the rubber band on
the pins, it’s under enough tension to either bend the pins, or snap the rubber
band due to vibration. Notice those four little holes in the top plate? They’re
for nylon screws, you can optionally add them to help keep the controller board
on axis. In practice though, the rubber band should be enough.
Step Seven – Software Setup

I chose the
Quadrino Zoom, which is about mid-range price-wise, because it has a full 10DOF
sensor platform, and is very well laid out. Flying with mag-lock is great for
beginners and lets you fly without having to worry about craft orientation. I
wish it had a built in buzzer, and an on-board current sensor, but it’s a very
nice out of box experience as far as controllers go.
Once you
download the multiwii software and open it up in Arduino, head on over to the config.h file and
change a few important things.
·
#define QUADX // our flight configuration
·
#define QUADRINO_ZOOM // our controller
·
#define MOTOR_STOP // this will keep the props spun down when throttle
is at a minimum. Useful for throttle cut when you’re first crashing^H^Hlearning
to fly.
You’ll also
need to set the minimum ESC engage threshold. Again, see the MultiWii site for
that howto.
Go Fly!
The contents has provided meaningful information thanks for sharing info
ReplyDeleteHow to make a Quadcopter